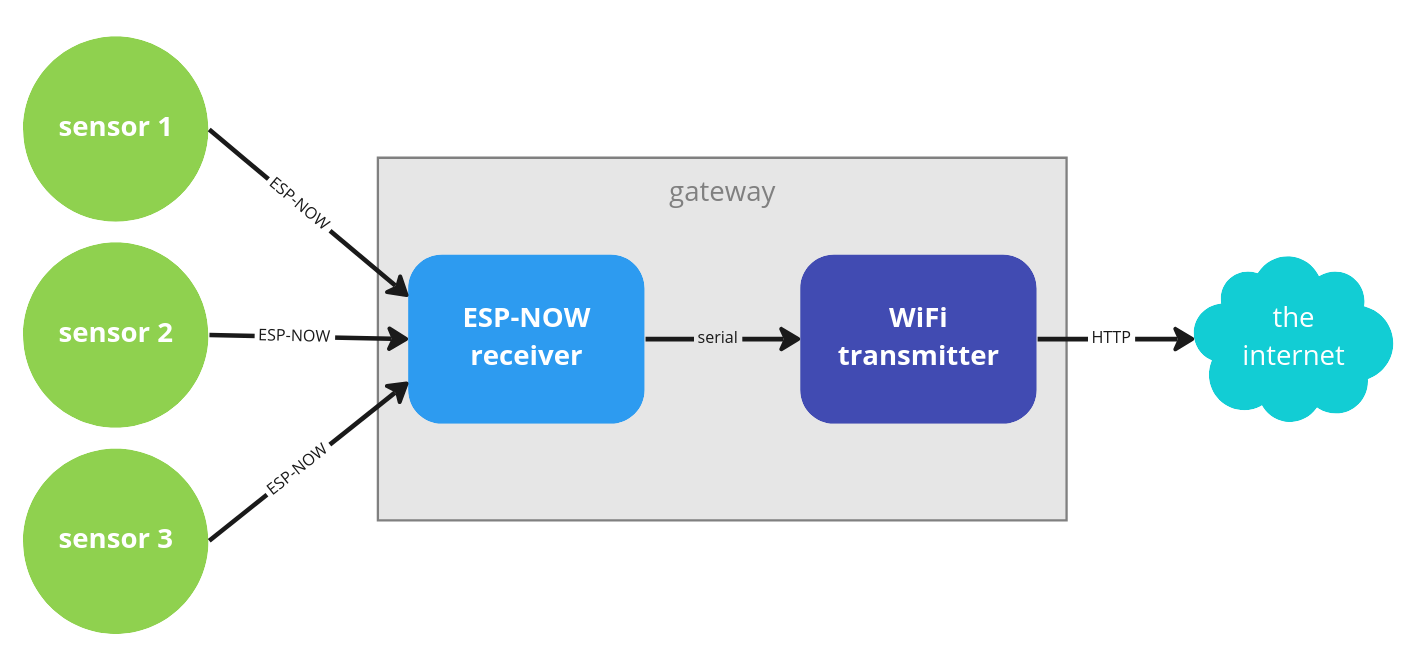
ESP-NOW is a much more energy efficient protocol compared to regular WiFi that can make your battery-powered ESP devices run for months or even years. The downside is that we usually want to send data to servers that don’t speak ESP-NOW. So here is a solution: a gateway that takes ESP-NOW messages and sends them over WiFi, for example as HTTP requests to an API.
This project was inspired by the ESP-NOW to MQTT gateway video (and code) by MrDIY. But I have adapted it to HTTP and also changed the message structure so it works for all kinds of messages.
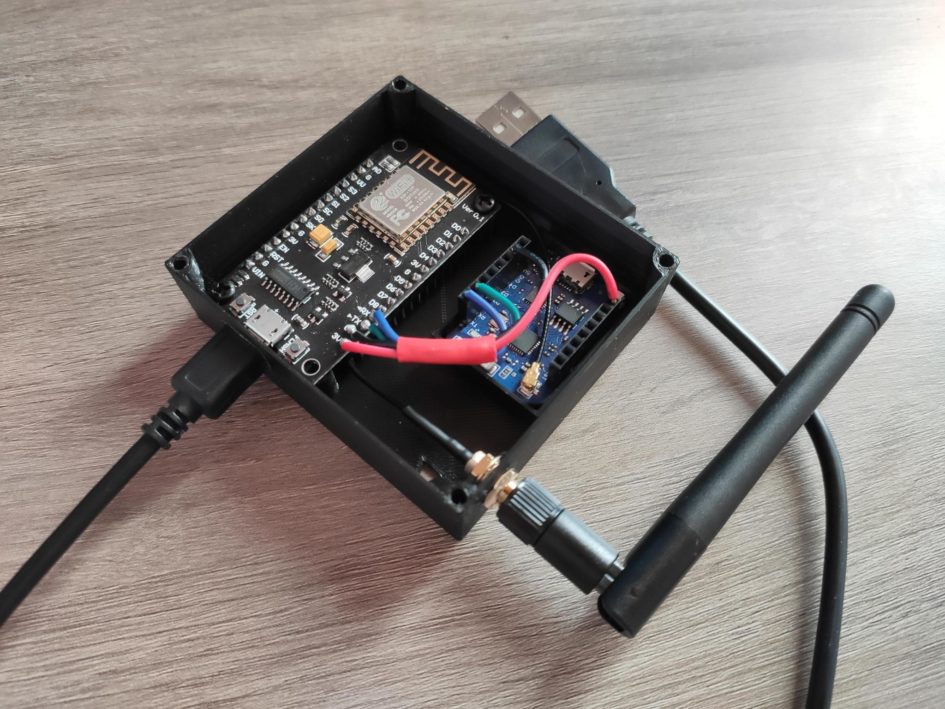
The gateway has two ESP8266 boards. You could use just one but it requires setting a fixed WiFi channel and all sensors knowing that channel which isn’t ideal. But since ESPs are dirty cheap I think using two is better.
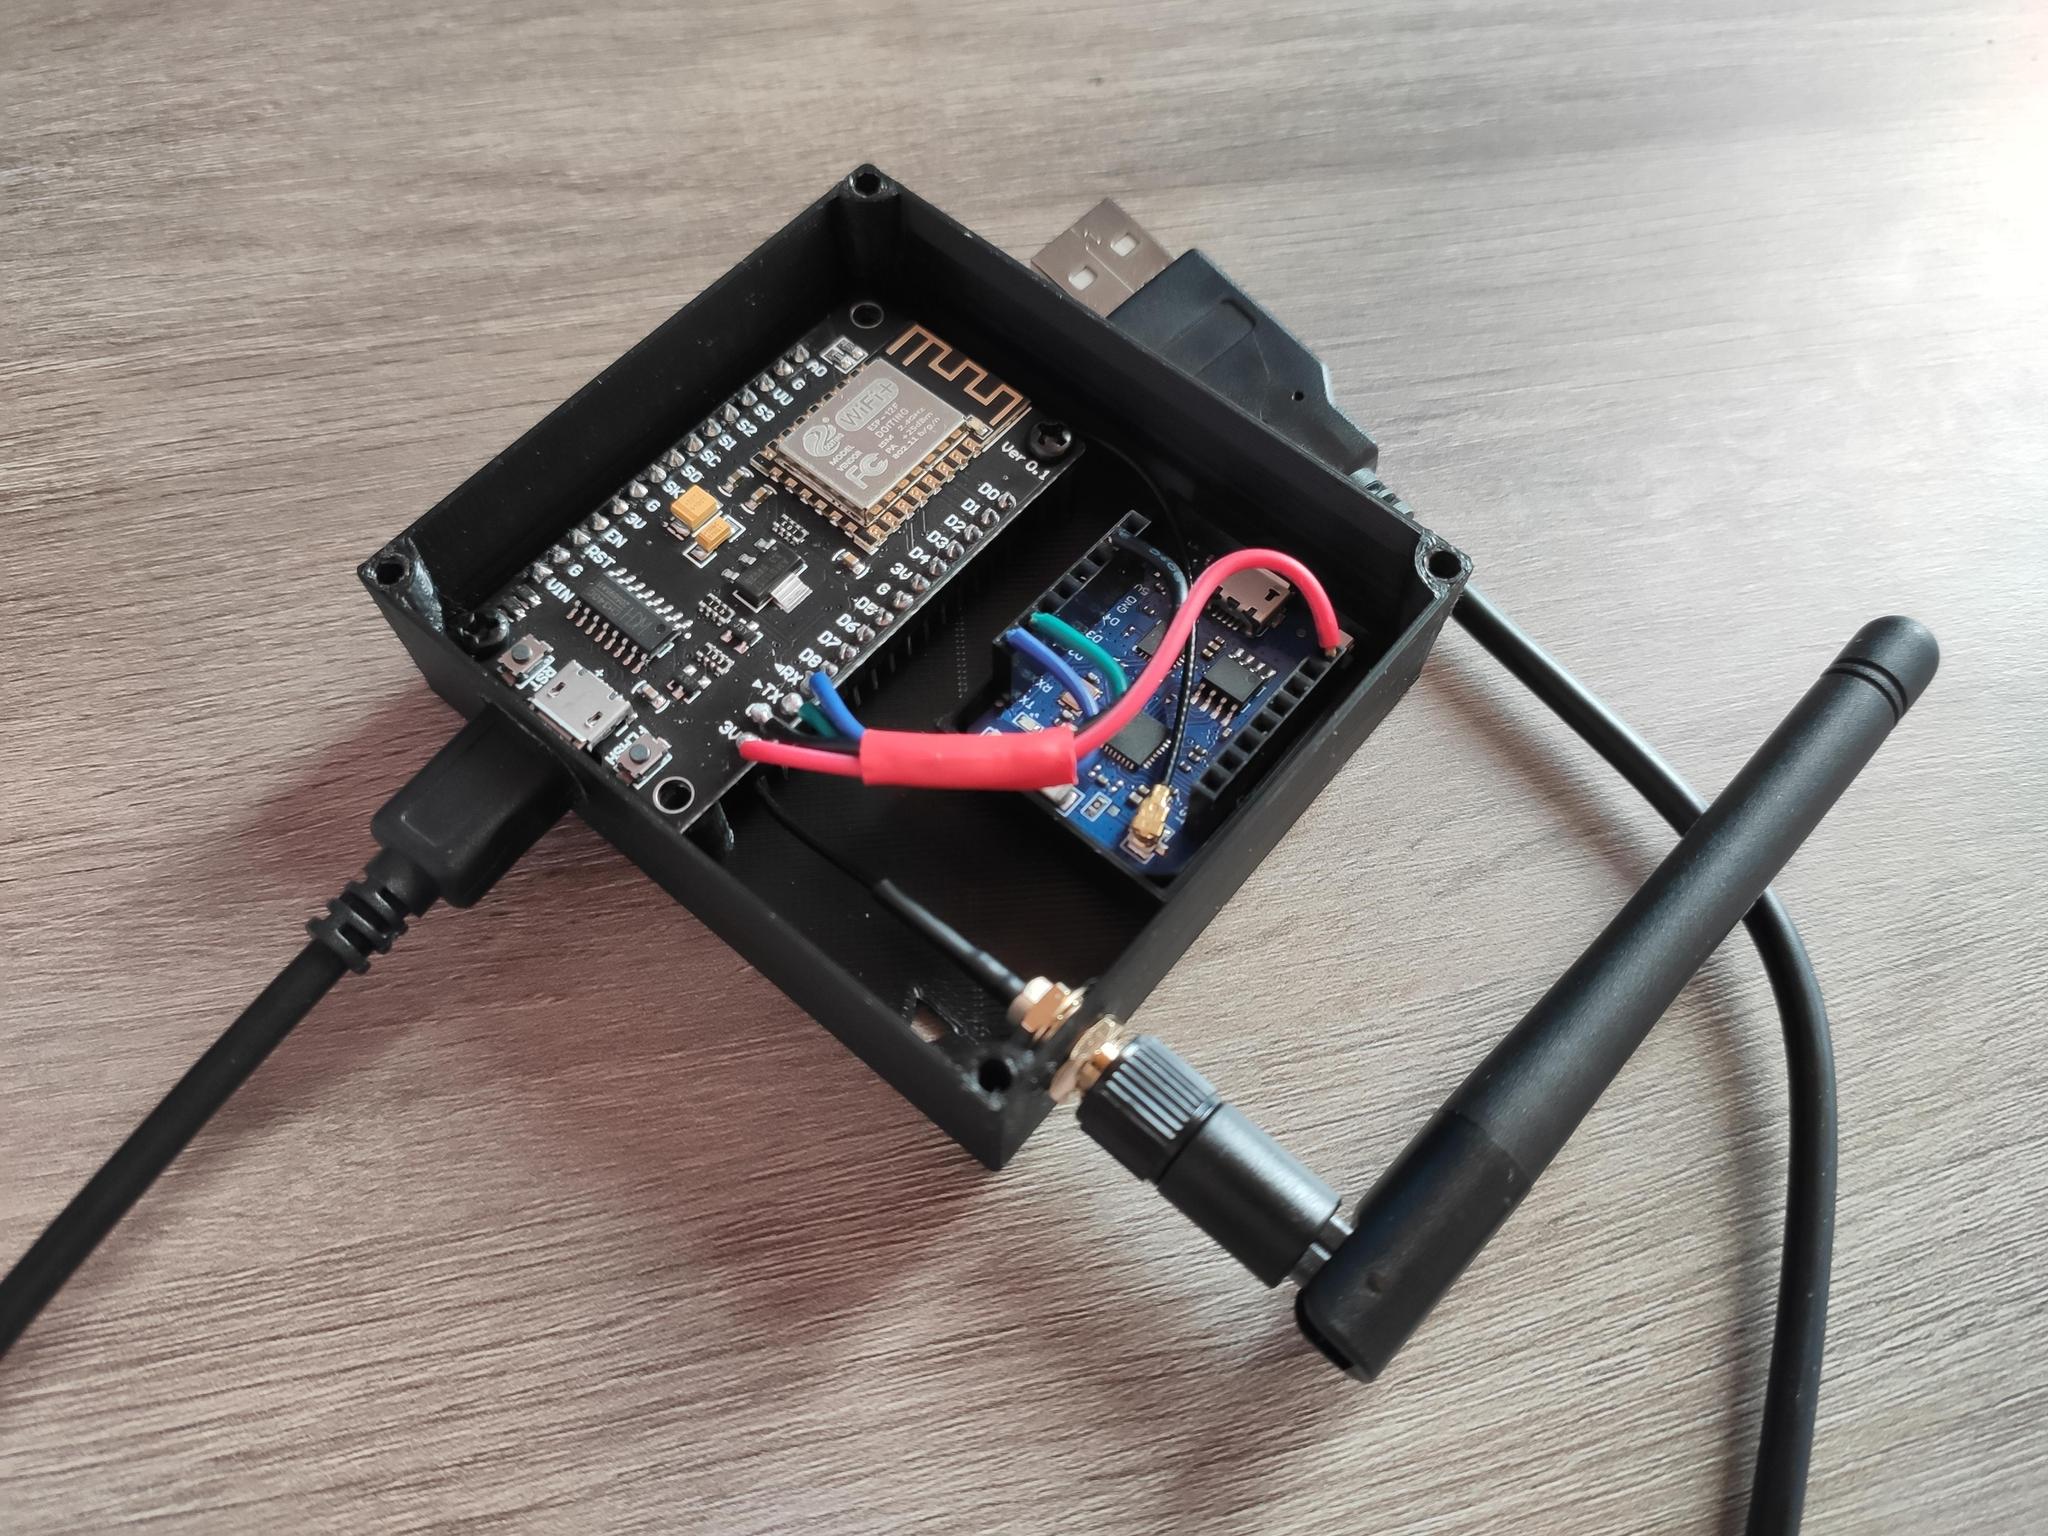
I will be using a Wemos D1 mini pro as the ESP-NOW receiver and a NodeMCU v1 as the WiFi transmitter. You can use whatever you have but it is very important that the ESP-NOW receiver has an external antenna. I tried using other Wemos boards that have an internal antenna and the range was ridiculous, only a few centimeters. But with this setup the range is pretty decent, like 10 meters with multiple walls in between, and your sensors don’t need external antennas, just the receiver.
Connections
The connection between the boards is pretty straightforward: RX on one board connected to TX and the other and vice versa. And then for power, the NodeMCU will be connected via USB and then the Wemos will get power from the 3.3V pin. Ground to ground and that’s it.
Didn’t find a Wemos D1 mini pro for the diagram so I used a D1 mini.

Code
Below you will find the code for the three main components of this project:
- An ESP-NOW sender: could be any sensor, this is just an example so you can test that everything works and then adapt it to your needs.
- The ESP-NOW receiver: should be fine as is, but feel free to enter a different MAC address if you want.
- The WiFi transmitter: you will need to change the WiFi credentials and the API details. And if you want to use MQTT instead of HTTP you should be able to adapt it easily.
ESP-NOW Sender
An example of what a sender would look like, in my case it is a temperature and humidity sensor but I’ve removed that part for simplicity and instead I just send fixed values every 30 seconds.
I use a somewhat generic message that consists of a couple strings:
- a sensor id: any string to identify the sensor that is sending the message, for example «test»
- a payload: it can be any string, I will be using JSON
I limited the total message size to 200 bytes as that is (apparently) the max ESP-NOW supports on ESP8266. It is 250 bytes for ESP32.
#include <ESP8266WiFi.h>
#include <espnow.h>

uint8_t receiverAddress[] = {0x12, 0x34, 0x56, 0x78, 0x9A, 0xBC};
char sensor_id[20] = "test";
const char* payload = "{\"temperature\":%.02f,\"humidity\":%.02f}";

typedef struct sensor_message {
  char id[20];
  char payload[180];
} sensor_message;
sensor_message myMessage;

void setup() {
  Serial.begin(115200);
  Serial.println();

  WiFi.mode(WIFI_STA);

  setupEspNow();
}

void setupEspNow() {
  if (esp_now_init() != 0) {
    Serial.println("Error initializing ESP-NOW");
    delay(1000);
    ESP.restart();
  }

  esp_now_set_self_role(ESP_NOW_ROLE_CONTROLLER);
  esp_now_register_send_cb(onDataSent);

  int status = esp_now_add_peer(receiverAddress, ESP_NOW_ROLE_SLAVE, 1, NULL, 0);
  if (status == 0) {
    Serial.println("Adding peer succeeded");
  } else {
    Serial.print("Adding peer failed.");
  }
}

void onDataSent(uint8_t* mac_addr, uint8_t sendStatus) {
  if (sendStatus == 0){
    Serial.println("Delivery succeeded");
  } else{
    Serial.print("Delivery failed!");
  }
}

void loop() {
  float temperature = 12.50;
  float humidity = 49.31;
  strcpy(myMessage.id, sensor_id);
  snprintf(myMessage.payload, 180, payload, temperature, humidity);

  int status = esp_now_send(receiverAddress, (uint8_t *) &myMessage, sizeof(myMessage));
  if (status == 0) {
    Serial.println("Sending message succeeded");
  } else {
    Serial.print("Sending message failed");
  }

  delay(30000);
}
ESP-NOW Receiver
The receiver listens for messages via ESP-NOW and when it gets one it writes the content (the raw bytes) to the serial interface.
#include <ESP8266WiFi.h>
#include <espnow.h>

uint8_t fixedAddress[] = {0x12, 0x34, 0x56, 0x78, 0x9A, 0xBC};

void setup() {
  Serial.begin(115200);
  WiFi.disconnect();
  WiFi.mode(WIFI_STA);
  wifi_set_macaddr(STATION_IF, &fixedAddress[0]);
  if (esp_now_init() != 0) {
    delay(1000);
    ESP.restart();
  }
  esp_now_set_self_role(ESP_NOW_ROLE_SLAVE);
  esp_now_register_recv_cb(onDataRecv);
}

void onDataRecv(uint8_t *macAddress, uint8_t *incomingData, uint8_t length) {
  Serial.write(incomingData, length);
  Serial.write('\n');
}

void loop() {}
WiFi Transmitter
This component reads messages (bytes) from the serial port (RX/TX), converts those bytes back into a message structure and then sends a POST request to an API with the sensor id as part of the URL and the JSON payload as the request body.
#include <ESP8266WiFi.h>
#include <ESP8266HTTPClient.h>

#define DEBUG_FLAG 1
#ifdef DEBUG_FLAG
#define debug(x) Serial.print(x)
#define debugln(x) Serial.println(x)
#else
#define debug(x)
#define debugln(x)
#endif

const char* WIFI_SSID = "YOUR_WIFI";
const char* WIFI_PASS = "the password of your wifi";
const char* API = "http://192.168.1.100:7000/api/sensor/";

typedef struct sensor_message {
  char id[20];
  char payload[180];
} sensor_message;
sensor_message myMessage;
uint8_t incomingData[sizeof(struct sensor_message)];
size_t incomingDataLength;

WiFiClient client;
HTTPClient http;
char url[255];

void setup() {
  Serial.begin(115200);
  WiFi.mode(WIFI_AP_STA);
  WiFi.setSleep(WIFI_PS_NONE);
  WiFi.begin(WIFI_SSID, WIFI_PASS);

  while (WiFi.status() != WL_CONNECTED) { debug("."); delay(200); }
  debugln("connected to wifi");
}

void loop() {
  if (Serial.available()) {
    incomingDataLength = Serial.readBytesUntil('\n', incomingData, sizeof(myMessage));
    if (incomingDataLength == sizeof(myMessage)) {
      handleMessage(incomingData);
    }
  }
  delay(100);
}


void handleMessage(uint8_t* data) {
  debug("New message from sensor: ");

  memcpy(&myMessage, data, sizeof(myMessage));
  debugln(myMessage.id);
  debug("Payload: ");
  debugln(myMessage.payload);

  sendToAPI(&myMessage);
}

void sendToAPI(sensor_message* message) {
  strcpy(url, API);
  strcat(url, message->id);
  http.begin(client, url);
  http.setTimeout(1000);
  http.addHeader("Content-Type", "application/json");
  int httpResponseCode = http.POST(message->payload);
  http.end();
  client.stop();
  debugln("Message sent");
}
The good and the bad
WiFi is more convenient, let’s get that out of the way. But it is slow, very slow, and power hungry. Terrible combination when running on batteries. As we saw in a previous article, connecting to WiFi takes seconds while ESP-NOW takes only milliseconds.
But it is possible to speed up dramatically the connection to WiFi as explained by John Mueller in his blog. Unfortunately it involves configuring your WiFi to use the same channel all the time and giving your sensors the MAC of the router they have to connect to, apart from an IP address, the IP of a DNS server and things like that. Not ideal but hey, if you can live with that it is easier than setting up a gateway!
In my case since I have multiple routers at home running them all in the same channel was not a good idea. I am also not a big fan of having IPs and MACs hard-coded in sensors if I can avoid it. With ESP-NOW I need to know the MAC of the gateway but that one won’t change and is the only hard-coded thing.
As a result my sensor went from a month on batteries to over a year and a half thanks to this. Massive difference. At least on paper, it has not been running for that long yet hehe.
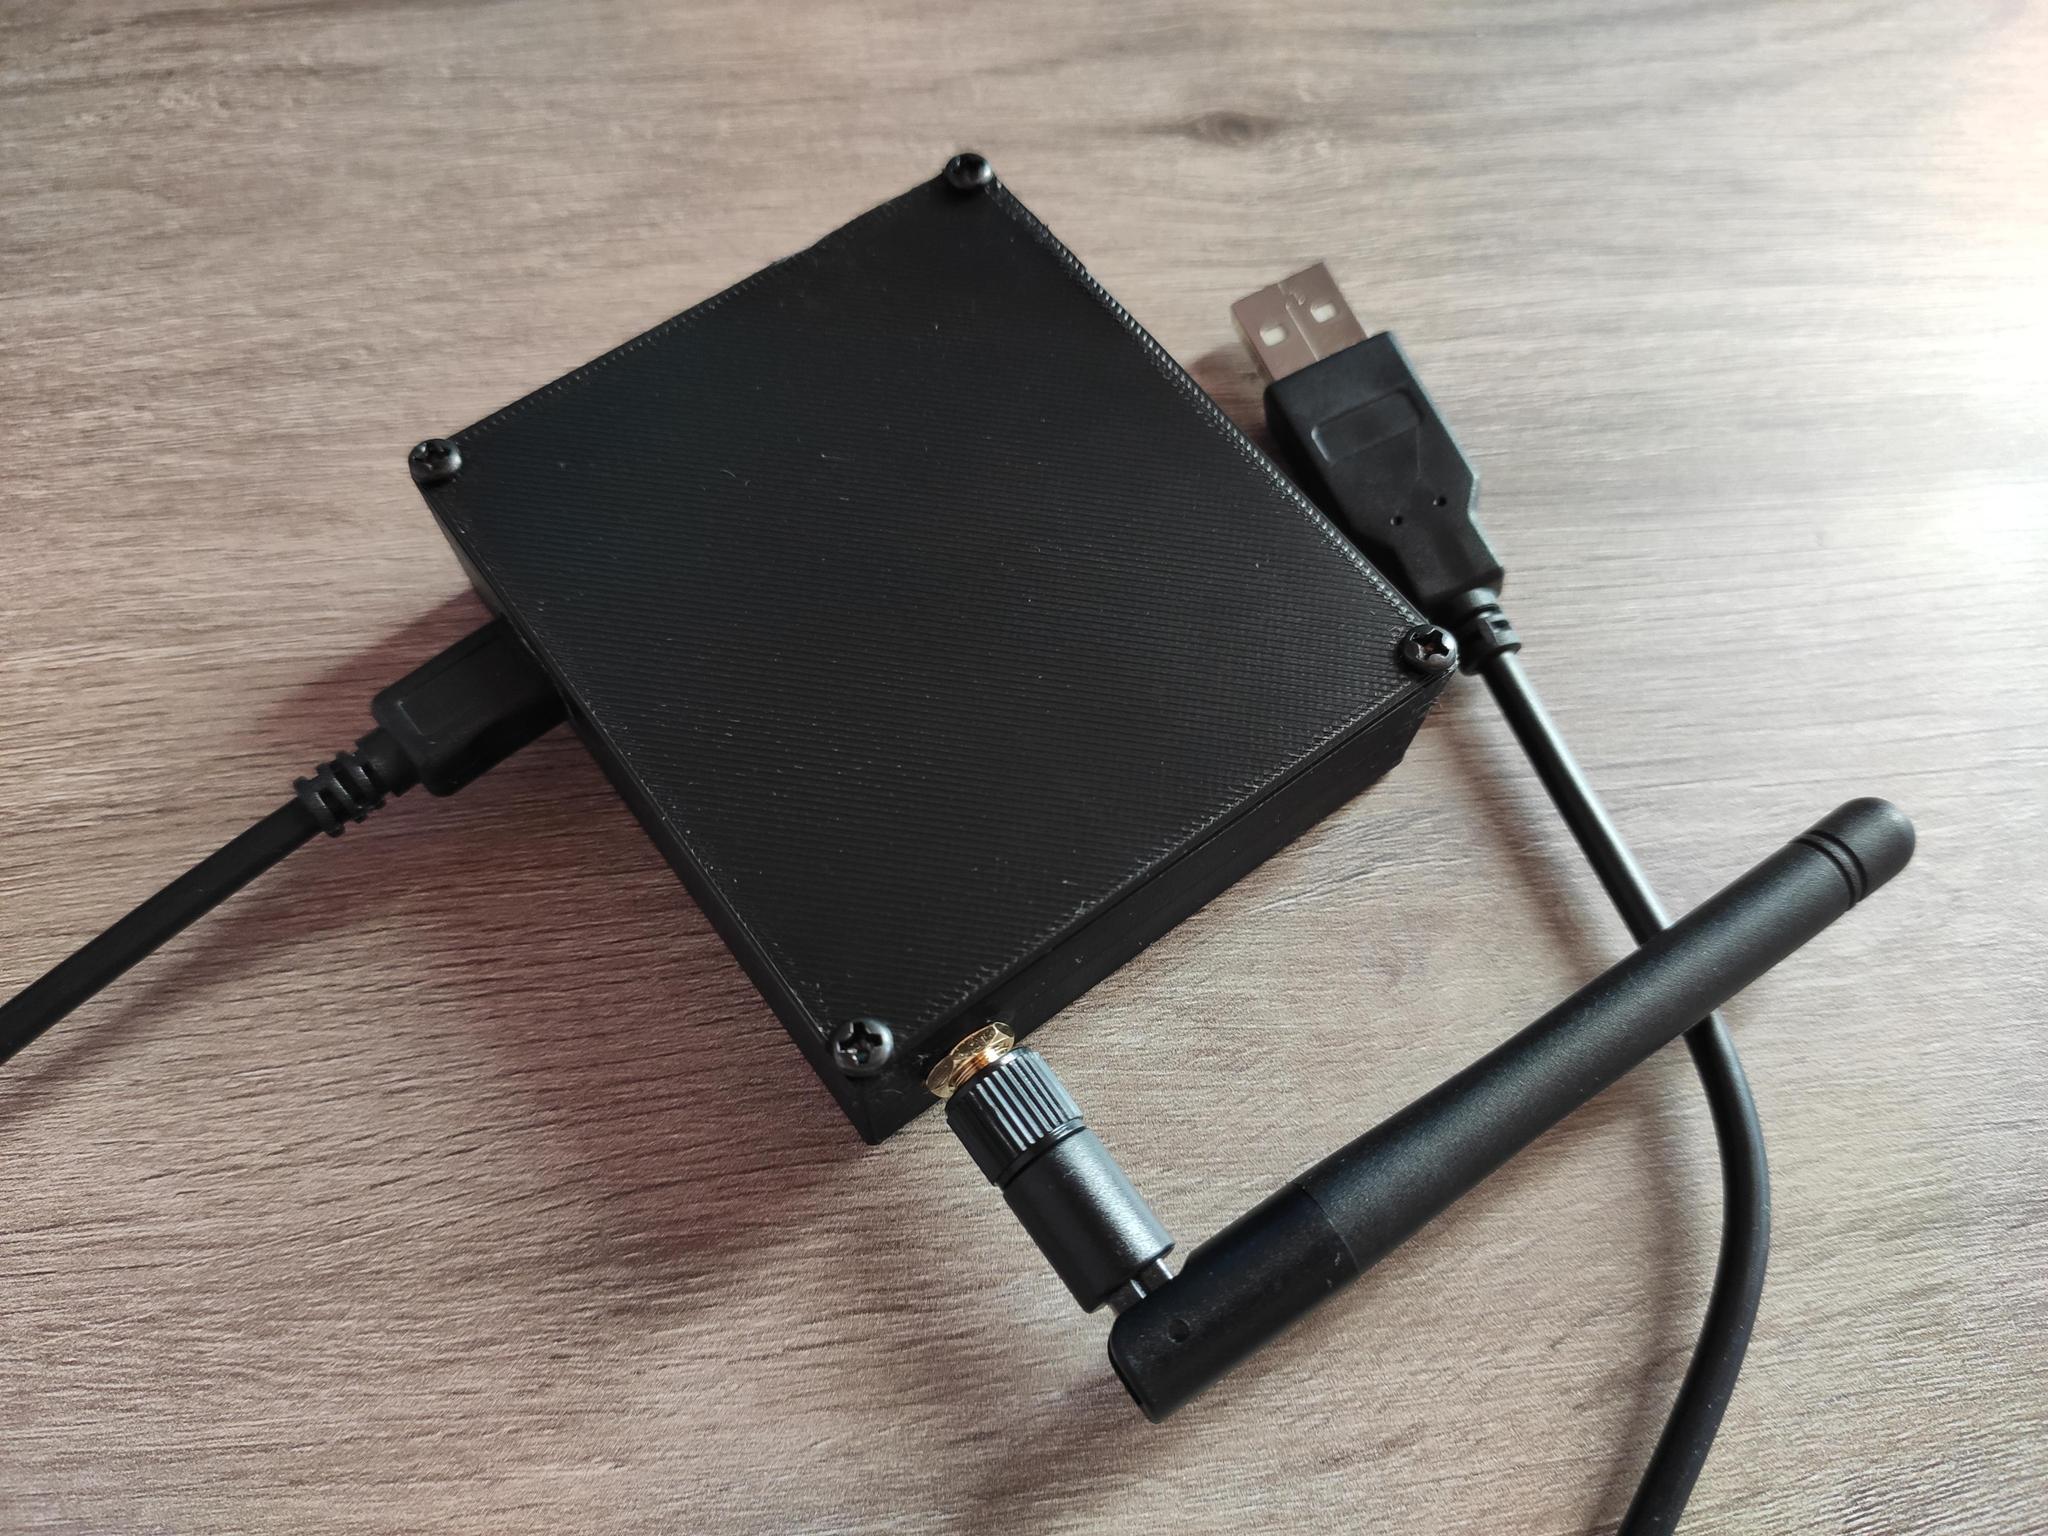
Lastly for those of you reading until the end here is a few pictures of the result, turned out pretty decent if I do say so myself. Let me know what you think in the comments, or message me on Mastodon.

Hi Salvatore,
thank you for the good job! Everything works fine with my three ESP8266!
But I’m a newbee in coding and try to sent the payload to my local mqtt-server to use the data in homeassistant. But I’m to stupid to change your code from http-API to mqtt. Would you like to help me please?
Andre
Sure, instead of the sendToAPI() function you probably want something like this:
void sendToMqtt(sensor_message* message) {
  strcpy(topic_plus_sensor, MQTT_TOPIC);
  strcat(topic_plus_sensor, message->id);
  mqttClient.publish(topic_plus_sensor, message->payload);
}
Of course you also need to setup MQTT in the setup(), something like:
void setupMQTT() {
  mqttClient.setServer(MQTT_SERVER, MQTT_PORT);
  int retries = 0;
  while (!mqttClient.connected()) {
    if (mqttClient.connect("Gateway", MQTT_USER, MQTT_PASS)) {
      Serial.println("MQTT connected");
    } else {
      Serial.print(".");
      delay(100);
    }
    retries++;
    if (retries > 100) return;
  }
}
And for all that to work, a few variables and constants for you to define:
That should send all messages to MQTT on topics like homeassistant/test or whatever the sensor_id is on the message.
Thanks a lot, but unfortunaly I get some compiling errors:
C:\Users\loss\Documents\Arduino\espnow-wifi-mqtt-gateway\espnow-wifi-mqtt-gateway.ino: In function 'void setupMQTT()':
C:\Users\loss\Documents\Arduino\espnow-wifi-mqtt-gateway\espnow-wifi-mqtt-gateway.ino:56:14: error: request for member 'setServer' in 'mqttClient', which is of non-class type 'PubSubClient(WiFiClient)'
   56 |   mqttClient.setServer(MQTT_SERVER, MQTT_PORT);
      |              ^~~~~~~~~
C:\Users\loss\Documents\Arduino\espnow-wifi-mqtt-gateway\espnow-wifi-mqtt-gateway.ino:58:22: error: request for member 'connected' in 'mqttClient', which is of non-class type 'PubSubClient(WiFiClient)'
   58 |   while (!mqttClient.connected()) {
      |                      ^~~~~~~~~
C:\Users\loss\Documents\Arduino\espnow-wifi-mqtt-gateway\espnow-wifi-mqtt-gateway.ino:59:20: error: request for member 'connect' in 'mqttClient', which is of non-class type 'PubSubClient(WiFiClient)'
   59 |     if (mqttClient.connect("Gateway", MQTT_USER, MQTT_PASS)) {
      |                    ^~~~~~~
C:\Users\loss\Documents\Arduino\espnow-wifi-mqtt-gateway\espnow-wifi-mqtt-gateway.ino: In function 'void sendToMqtt(sensor_message*)':
C:\Users\loss\Documents\Arduino\espnow-wifi-mqtt-gateway\espnow-wifi-mqtt-gateway.ino:95:14: error: request for member 'publish' in 'mqttClient', which is of non-class type 'PubSubClient(WiFiClient)'
   95 |   mqttClient.publish(topic_plus_sensor, message->payload);
      |              ^~~~~~~


exit status 1


Compilation error: request for member 'setServer' in 'mqttClient', which is of non-class type 'PubSubClient(WiFiClient)'
My code looks like this, only the user/pass I have changed:
#include <ESP8266WiFi.h>
#include <ESP8266HTTPClient.h>
#include <PubSubClient.h>
#define DEBUG_FLAG 1
#ifdef DEBUG_FLAG
#define debug(x) Serial.print(x)
#define debugln(x) Serial.println(x)
#else
#define debug(x)
#define debugln(x)
#endif
const char* WIFI_SSID = «SSID»;
const char* WIFI_PASS = «pass»;
typedef struct sensor_message {
char id[20];
char payload[180];
} sensor_message;
sensor_message myMessage;
uint8_t incomingData[sizeof(struct sensor_message)];
size_t incomingDataLength;
WiFiClient client;
HTTPClient http;
char url[255];
const char* MQTT_SERVER = «192.168.20.30»; // or whatever the MQTT host is
const int MQTT_PORT = 1883;
const char* MQTT_TOPIC = «ESP-01/Sensor01/»;
const char* MQTT_USER = «user»;
const char* MQTT_PASS = «pass»;
PubSubClient mqttClient(WiFiClient);
char topic_plus_sensor[255];
void setup() {
Serial.begin(115200);
WiFi.mode(WIFI_AP_STA);
WiFi.setSleep(WIFI_PS_NONE);
WiFi.begin(WIFI_SSID, WIFI_PASS);
while (WiFi.status() != WL_CONNECTED) { debug(«.»); delay(200); }
debugln(«connected to wifi»);
}
void setupMQTT() {
mqttClient.setServer(MQTT_SERVER, MQTT_PORT);
int retries = 0;
while (!mqttClient.connected()) {
if (mqttClient.connect(«Gateway», MQTT_USER, MQTT_PASS)) {
Serial.println(«MQTT connected»);
} else {
Serial.print(«.»);
delay(100);
}
retries++;
if (retries > 100) return;
}
}
void loop() {
if (Serial.available()) {
incomingDataLength = Serial.readBytesUntil(‘\n‘, incomingData, sizeof(myMessage));
if (incomingDataLength == sizeof(myMessage)) {
handleMessage(incomingData);
}
}
delay(100);
}
void handleMessage(uint8_t* data) {
debug(«New message from sensor: «);
memcpy(&myMessage, data, sizeof(myMessage));
debugln(myMessage.id);
debug(«Payload: «);
debugln(myMessage.payload);
sendToMqtt(&myMessage);
}
void sendToMqtt(sensor_message* message) {
strcpy(topic_plus_sensor, MQTT_TOPIC);
strcat(topic_plus_sensor, message->id);
mqttClient.publish(topic_plus_sensor, message->payload);
Do you have any idea what happens?
Andre
You have:
When it should be:
Haven’t tested the code but it should compile at least.
Hi Salvatore, I changed the line as you tell me and the code will be compiled without any errors. Thanks a lot!
But it seems, that the «void setupMQTT» is not working, because where is no output in the serial monitor like «MQQT connected» or «……..». No data will be transfered to the mqtt-server. Here the first lines of seriel-output:
18:27:17.567 -> .....................connected to wifi

18:27:22.244 -> New message from sensor: SensorBad

18:27:22.244 -> Payload: {"temperature":25.01,"humidity":46.35}

18:27:24.673 -> New message from sensor: SensorBad

18:27:24.673 -> Payload: {"temperature":25.01,"humidity":46.35}

18:27:27.774 -> New message from sensor: SensorBad

18:27:27.774 -> Payload: {"temperature":25.01,"humidity":46.28}

18:27:30.885 -> New message from sensor: SensorBad

18:27:30.885 -> Payload: {"temperature":25.01,"humidity":46.28}

18:27:33.974 -> New message from sensor: SensorBad

18:27:33.974 -> Payload: {"temperature":25.03,"humidity":46.28}
You can see, that the payload is changing, but the mqtt is not connected.
Any ideas?
Andre
Hi Salvatore, I fixed it by myself 🙂
I put the content of the «void(setupMQTT)»-section into the «void(setup)»-section, thats it.
I have learned a lot, thank you for your help!
Andre
Hey, nice, good job Andre!
Hi Salvatore,
to improve your idea I added the DeepSleep feature of ESPNow to the script of the sensor and put the following line at last into the void loop:
ESP.deepSleep(1* 60* 1000000, WAKE_RF_DEFAULT);
The delaytime was comment out:
//delay(120000);
Now the sensor goes for 1×60 seconds into a DeepSleep-status and needs nearly no power. I hope, the sensor works now for a long time without changing the battery.
Note:
The ESP8266-Board I use (ESP-12F) needs a connection from GPIO16 zu RST for the wakeup-call. To find this solution took me the most time… 😉
How difficult do you believe it would be to reverse the communication flow to support relays instead of collecting data from sensors?
Also, it shouldn’t be too difficult to change out the boards for different ones since ESP and Arduino code is pretty similar.
In my current design, I have an Arduino Uno R4 WiFi as my webserver, wired to an NodeMCU to create the ESPNOW internet gateway. The NodeMCU sends commands to several ESP32 nodes to control my existing Christmas lights.
The design doesn’t require 2-way communication yet, but it would be a nice to have, encase I decide to add sensors later, say for interactivity. For example, to detect someone walking by so the display can do something special.
Hello Sleepy, I think reversing the communication should be doable. If I understand you correctly you want the gateway to read from Serial and send through ESPNOW right?
The question is, why would you send through ESPNOW and not WiFi? To me the biggest advantage of ESPNOW is power consumption. But in your scenario the ESP32 nodes that receive the messages have to be listening all the time right? So they can’t sleep. And if they are always on then I don’t think they will last for more than a few hours, regardless of the protocol.
Am I missing something?
They will always have power. I wasn’t leaning towards ESPNOW for it’s power consumption, but that I can isolated the Christmas lights from the rest of my WiFi. My router is too far away from the front of the yard and well, it’s seen better days.
With that said, can’t I use the NodeMCU to create it’s own WiFi network independent of my home network? I have no clue what I am doing.
Ah that makes sense.
Yes, you can create a network with the NodeMCU, it is called Access Point mode. And then have all the ESP32 connect to that network and wait for requests.
Or continue with your idea of using ESPNOW cause if the wifi range is a limiting factor I think ESPNOW has better range. Much lower speed of course, but if you are not sending lots of data who cares.
I would say try both, cause depending on if it is indoors or outdoors and the antennas on your boards the difference between WiFi and ESPNOW might be substantial in terms of range. Try it, sounds like an interesting experiment!
Thanks for your feedback!
Would have saved some time if I read this post aswell… 😀
crazy that two d1s only having a stable range of ~30cms. Didn’t even consider range as a problem having seen so many posts with ranges in the hundreds of meters. Just resoldered all connections because I thought the unreliability would have most likely been caused by a loose contact when I noticed that it seemed increasingly reliable the closer I got. Weird that I have not seen this noticed anywhere, apart from this blog.
Could it be a D1-problem?
Just ordered an antenna, hoping one receiver is enough for the range I’m trying to cover, given the rather thick walls.
Haha yeah, I remember programming the boards one next to the other and all was fine. Then moved one board to a different plug, same room, and nothing. What the fuck? Must have disconnected something… no. Ok back to the desk to troubleshoot, wait now it works??? 😑
But after switching to a wemos pro with an external antenna no more issues. There are a couple walls plus a few other obstacles between one of my sensors and the receiver.
And the decrease in consumption is massive, well worth the inconvenience of having a gateway: using WiFi I had to change the battery (a 18650) of this sensor every month. With ESPNOW it’s been running since February, and should still last for many more months. It is awesome.
See you around marius!
Since 2 years now I try t reduce power consumption of my sensor and i finally found your blog.
It’s awsome and that’s what I was looking for.
I will try it next days in that way and hope it will works with a solar panel systems.
Thanks a lot for your really great work
Fabien
Thank you Fabien!
Feel free to come back when you have it working and leave a comment here with a link to the article in your blog. Doesn’t matter if it is in French.
Hi Salva,
Nice work on this design, I am planning to implement it on a remote water tank so I can monitor the level, only need updates every minute or so. It’s about 250m through the bush back to the house so I am planning on using the nRF24L01+, just wondering if you think this would be usable instead of the built-in WiFi of the ESP8266? I am currently reading about how to code for the nRF24.
Your thoughts?
Cheers
Hey Paul, I haven’t used RF modules but looking at the specs of the nRF24L01+ it operates at frequencies between 2.400GHz and 2.525GHz.
WiFi 2.4GHz operates between 2.412GHz and 2.484GHz.
So a couple thoughts:
Another idea, you could maybe try with 433MHz modules instead. They have better range and you can find them pretty cheap, also they are very common and using them shouln’t be too difficult with a library.
I would still give ESP-NOW a try. I’ve been surprised by the range so far. You won’t lose much, if it doesn’t work well, then use RF.
Thanks Salva! Really appreciate the quick and detailed reply. I will also try the 433MHz modules as I think I have a couple from a few years ago which I haven’t used yet. I also have a couple of these, again haven’t tried them but they should work well for this.
https://universal-solder.ca/si4432-lora-module/
For sure will be using ESP-NOW, it just makes good sense for my application.
Cheers
Hi Salva,
Well I am back to using ESP-NOW as intended with the ESP8266 modules, not HC-12 etc.. I have some high gain 2.4GHz antennas to use at both ends so I should be able to make the link work over 250m through the bush. I have been searching for over a week now and am unable to find a good example of code to extract RSSI from the ESP8266s using ESP-NOW. Do you have any idea how to get the RSSI of the link radios, not the wifi to AP, which I already have working? Thanks for any help you may be able to offer. Cheers Paul
Hey Paul, good to hear you are making progress!
I have no idea. Why don’t you test if messages are delivered instead? Have one board send one message per second, with consecutive numbers: 1, 2, 3, 4, 5… And the other board print them out to see if all of them arrive or if some of them are missing.
It is not the same as signal strength, but if all messages arrive successfully, do you really care about signal strength?
That’s how I tested my setup, connecting one board in different places of the house to check if the receiver was getting messages or not.