De entre todos los módulos que hay para Arduino, el bluetooth es en mi opinión el más interesante. Es muy barato, muy sencillo (no tiene más que 2 pines quitando alimentación y tierra), funciona como un puerto serie, es compatible con cualquier cacharro moderno como móviles y portátiles… y puede dar mucho juego.
Yo compré uno por 7$ en Aliexpress, el modelo HC-07 (no todos son iguales, los comandos AT pueden variar). Ahora están más baratos:
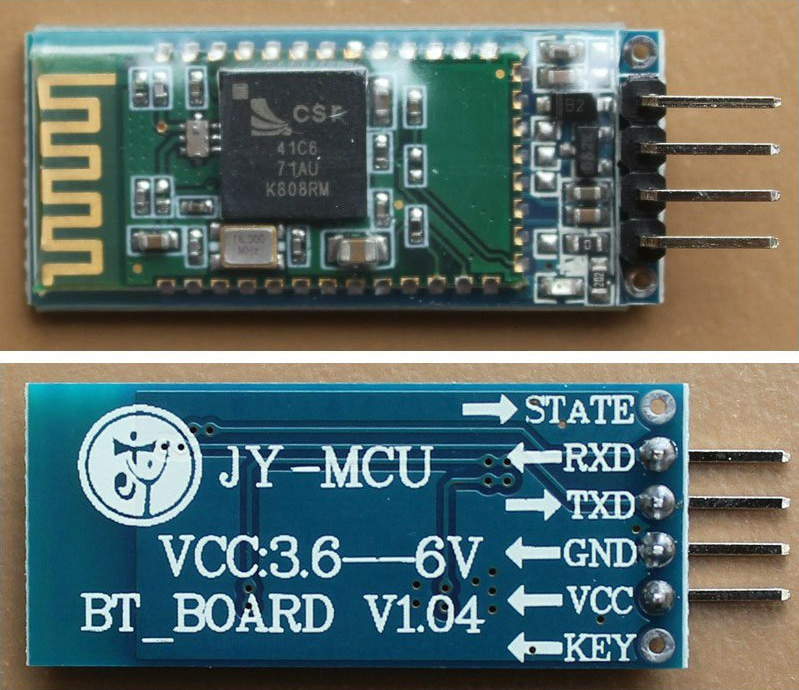
HC-07 bluetooth
Pero eso ya es cosa vuestra, yo os voy a dejar un pequeño programa para cargar en Arduino y que os permita configurar el módulo bluetooth. Sí, hay que configurar cosas como el nombre, el pin o la velocidad. No es complicado, basta con conectar los pines TX y RX del módulo bluetooth a un par de pines de Arduino, por ejemplo el 10 y el 11. Le diremos a nuestro Arduino que use esos dos pines como si fuesen un puerto serie y enlazaremos la entrada y salida con el puerto serie de nuestro Arduino. De esta forma, cuando escribas en el monitor serie, Arduino enviará eso al módulo bluetooth, y cuando el módulo responda, Arduino nos enchufará su respuesta en el monitor serie:
/*
+ Ejemplo de configuracion:
+ Cargamos el programa
+ Abrimos el monitor serial y seleccionamos "Nueva linea"
+ Escribimos los siguientes comandos:
AT
AT+PIN0000
AT+NAMEarduino
+ Deberia devolvernos:
OKOKsetPINOKsetname

* Comandos disponibles:
AT+VERSION     //devuelve la version
AT+PINxxxx     //establece como pin xxxx (maximo 4 digitos)
AT+NAMEmyname  //establece como nombre "myname" (maximo 20 chars)
AT+PN          //establece la paridad: AT+PN = No parity check
AT+BAUDx
*      1 >> 1200
*      2 >> 2400
*      3 >> 4800
*      4 >> 9600 (Default)
*      5 >> 19200
*      6 >> 38400
*      7 >> 57600
*      8 >> 115200
*      9 >> 230400
*/

#include

int led =         13;           // Pin of Blinking LED, default should be fine.
SoftwareSerial    bt(10, 11);   // Pins for RX, TX on Arduino Side (cruzados al bt)

String inputString = "";         // a string to hold incoming data
boolean stringComplete = false;  // whether the string is complete

void setup()
{
  pinMode(led, OUTPUT);
  Serial.begin(9600);

  bt.begin(9600);               // Speed of your bluetooth module, 9600 is default
  //digitalWrite(led, HIGH);      // Turn on LED to signal programming has started
  delay(1000);

  inputString.reserve(200);
}

void loop()                     // bridge the serial ports so setup can be done manually.
{
  if (bt.available()) {
    Serial.write(bt.read());    // Pipe Bluetooth to Debug Console
  }
  if (stringComplete) {
    bt.print(inputString);    // Pipe Debug Console to Bluetooth
    inputString = "";
    stringComplete = false;
    digitalWrite(led, HIGH);
    delay(100);
    digitalWrite(led, LOW);
  }
}

void serialEvent() {
  while (Serial.available()) {
    // get the new byte:
    char inChar = (char)Serial.read();
    // if the incoming character is a newline, set a flag
    // so the main loop can do something about it:
    if (inChar == '\n') {
      stringComplete = true;
    } else{
      // add it to the inputString:
      inputString += inChar;
    }
  }
}
Cargad el programa, abrid el monitor serie y escribid los comandos que queráis, por ejemplo para cambiar el nombre del dispositivo:
AT+NAMEsalvatore
Recordad que si cambiáis la velocidad del módulo, la próxima vez que queráis configurarlo deberéis editar esta línea en el setup:
bt.begin(9600);
Eso es todo, espero que os sirva. Cualquier duda, respondo en los comentarios.
Tengo un modulo HC-06 ya conectado al arduino y configurado.
Desde la pc conecto con él (a traves de bluetooth) con el hiperterminal y todo funciona bien. Le envio datos desde la pc y recibe el arduino.
Mi problema es que desde un movil android no consigo ni siquiera ver el dispositivo HC-06. ¿ por que ?
He probado con varios moviles y ninguno ve al HC-06
¿ Que me falta ?
si el ordenador encuentra al dispositivo, el móvil también debería. no hay mucho que configurar, de hecho para visualizar el dispositivo ni siquiera hay que conectar RX y TX. prueba a bajarte la app BlueTerm para hacer las pruebas, es sencilla y funciona bastante bien. lo único que se me ocurre es que tengas un módulo maestro en vez de esclavo, y por eso te esté dando problemas. el HC-07 solo funciona en modo esclavo con lo cual es más sencillo, pero el HC-06 no estoy seguro…
El modulo HC-06 funciona como master o slave. el HC-05 solo slave. Debes tener ese problema. Saludos.